
Impress your Guests - Craft Brewing Coffee for a Crowd

It’s holiday time again – Easter and Passover are big gathering times. Now that you’re the official “coffee geek” in your family, they probably asked you to brew coffee before, during or after dinner.
You’d love to brew coffee for everyone, but that crowd is huge! How can I really show off that great new single origin microlot coffee for all of those people?
Never fear – it’s easier than you think.
You don’t have to be a professional barista with thousands of dollars of equipment to brew for a crowd. In fact, with a little pre-planning, you can probably serve 20-30 with the gear you have right now.
Before we get into the actual process, here’s a quick outline of some essential gear you’re going to need to accomplish this feat:
- Two of a chosen brewing method or methods and associated gear (filters, timer, etc)
- An good sized electric kettle (see step 2 below)
- A second pouring kettle if your doing a pour over method
- A means to hold pre-measured coffee beans (paper cup, ramekins, zip-loc bags)
- A grinder – preferably an electric burr grinder – Or a hand grinder and a friend with big biceps.
- A thermal airpot. These can be had new for about $40 or you can rent a thermal coffee server from a local party store for next to nothing.
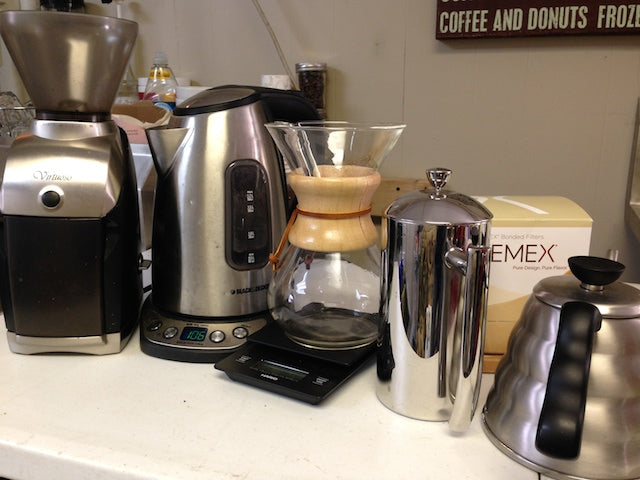
My “Brew For a Crowd” setup. Sometimes the French Press gets swapped out with a second Chemex. Depends on my mood.
With that list in mind, here we go:
Step 1 – Choose the Right Brewing Method
Even if you love the Aeropress or a nell drip, you’re probably not going to be able to brew enough coffee fast enough for a crowd of 20-30 people. Same goes for a small pour over like a Hario V60.
Your best bet is to chose something that makes a fair amount of coffee with each batch. Chemex is my favorite. A french press is another great option as long as the press you’re using makes at least 2 or 3 servings (16-24 oz) at a time.
Once you’ve made your choice, you’ll need at least two of whatever brewing method you use. If you need to mix and match that’s fine. Pull out your Chemex as well as your french press. If you need to beg, borrow or steal a second Chemex from a friend do it! (ok – maybe not steal).
Step 2 – Water is the Most Difficult Part
“A watched pot never boils” is never more true than when you have a group of thirsty people waiting on coffee. This will be your most difficult hurdle to overcome and may require a small investment on your part.
Stovetop is not an option. Especially electric or gas ranges. They’re nowhere near fast enough.
Open pots are not an option either Boiling water in an open pot on the stove cools to about 180 degrees at an alarming rate. You need something enclosed to hold in the heat.
Your best bet is a good electric kettle. Fortunately, you can find one from your local Target or other appliance store for less than $50. Nothing fancy, no variable temperature, cordless or anything like that. Just a basic kettle that has some size to it. Mine is a Black and Decker 1.7 liter kettle and works great.

My 1.7L Black and Decker Electric Kettle – well used (note the dent). Variable temp is a feature I NEVER use – everything I do is to a boil.
Step 3 – Setup on Location
Unless you’re an incurable introvert who would rather spend the entire time with your brewing equipment, set some proper expectations for the big day. Don’t let people think they’ll be drinking craft brewed coffee all day. Your coffee is an event in itself. It’s an entire course in the meal. Treat it as such.
Claim some space and set up your gear. I like to make sure my setup flows from left to right. It’s especially important to keep all your gear within arms reach. You don’t want to be running down the hall for the grinder while you’re trying to brew.
Step 4 – Showtime
Like any good chef, you’re going to need to start prep work a little bit before the course needs to be served. For a party of 20-30 people, I would have my first kettle of water boiling 30-45 minutes before the first cup of coffee needs to be served.
Start the Water Boiling
Throughout the process, you need to make sure that electric kettle stays full and heating all the time. Even if you don’t use all of the water in the kettle, refill it and start some more water boiling while you’re brewing.
If you’re using a Chemex brewer or another pour-over, once the water boils, pour it off into the pouring kettle that you’ll use to brew the coffee. Then top off the electric kettle and get it boiling once again. Your electric kettle should never be sitting idle.
Pre-Measure Your Coffee Beans
You’re going to want at least 3-4 pre-measured servings that you can just dump in the grinder quickly. You can keep them in paper cups, in ramekins, in zip-loc baggies, whatever. Unless, of course, your coffee setup includes something über cool like the Esatto.

Pre-measured beans. All ready to be dumped into the grinder.
Grind and Brew Your First Batch
Start brewing in one of your brewing methods. When it’s about half way done, start the second brewing method. Throughout the entire process, alternate these two as much as you can. (Is that kettle heating water?)
Decant the brewed coffee into an Thermal Carafe or Airpot.
As soon as you finish brewing, pour the coffee into your thermal holding container. Brew until all of your holding containers are completely full, then brew one more in each brew method that you have.
Serve using the last batch first.
That last brew that you did is likely not in a thermal carafe. It’s going to get cold faster than the first brew you did. Get rid of it first. Then serve using the carafes or airpots.
Refill the Airpot
Once everyone has had their first round of coffee, go ahead and brew a second round. Fill up the carafes or airpots once again, and then brew one more Chemex or French Press. That should be enough to keep the majority of people enjoying your coffee and still have enough for a second round.
When all of the carafes are full, everyone’s enjoying their coffee, fill up that electric kettle one more time and let it boil. Just in case grandpa needs something to stay awake during the game.
Step 5 – Bask in the Glow of Barista Awesomeness
Make a mental note to call your local café and offer your services.
Some Final Thoughts
- Consider making decaf in the drip pot. Most of the time only a very small percentage of the people will want decaf.
- Less is more. If you have any control over it, don’t pull out the big huge breakfast size mugs. Smaller cups work better. Let people come back for more.
- BYOW (Bring Your Own Water) Especially if you’re in an unknown area with potentially bad water. A couple of gallons should do it. Oh – your friend lives on a farm with their own well? Danger, Will Robinson…
- On the electric kettle – be careful where you plug it in. If it’s on the same circuit as grandma’s crockpot or the microwave, there’s a good chance you’ll blow the circuit. Nothing grinds things to a halt faster than everyone searching for the fuse box. Do a test run boiling water early on while other things are going on in the area. Worst case scenario, you might need to run an extension cord into the next room.
- Brag about your Brew Make sure people know the story behind that awesome single origin Finca Las Whatevers. Print out a single page about the coffee and make sure it’s visible to your guests.
